Introduction Link to heading
A few months ago, while browsing casually through GitHub, like we all do every now and then, I found a very interesting Repo about writing an OS. I always wanted to write a small OS just for fun and to learn more about my system, and I thought this is the perfect opportunity to do so.
The repository is based on this PDF written by Nick Blundell. Sadly, the title of that paper is a bit misleading, as it’s more about the bootsector. But this is ok for now, as that is what we will look at in this article. So if you ever feel like you want more information during this article, the paper might be a good starting point to search for it, though I will try to add further resources along the way.
Anyway, let’s have a look at the tools, shall we?
Tools Link to heading
I did this on a Linux machine, but you can get the needed tools on other systems, and you should be able to do all this on those, too.
-
nasm
Nasm is the netwide assembler compiler. We’ll use it to compile the Assembly files we will write to create our bootsector.
-
qemu
Qemu is an open source emulation software that we will use to run our small little bootsector. This way we do not need to do it on our actual hardware and possibly nuke our system.
The most boring simple boot sector imaginable
Link to heading
Before we jump right into the code, first we need to understand what we actually need to do. So let’s have a look at the theory.
The theory Link to heading
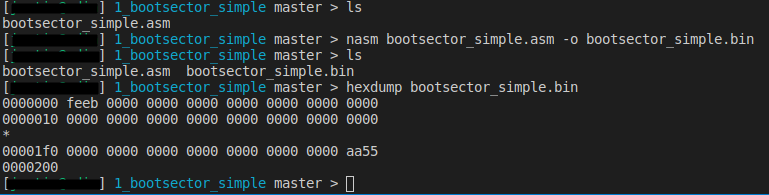
During the boot process, the BIOS cycles through the storage devices connected to your system, looks at the boot sector of each, which can be the first 512 bytes or the first 4096 bytes, and determines whether the data in that sector contains boot instructions. How does it determine this, you ask? Well, it is very simple, it looks at the last 2 bytes of the section. If those are 0xAA55, the BIOS knows it found a bootsector with boot instructions.
This is an example hexdump I did of a very simple boot sector not containing any instructions other than an infinite loop.
00000000  feeb 0000 0000 0000  0000 0000 0000 0000
00000010  0000 0000 0000 0000  0000 0000 0000 0000
*
000001f0  0000 0000 0000 0000  0000 0000 0000 aa55
Note the last part of the hexdump. 0xAA55 Our magic number to indicate to the BIOS “hey, this is a boot sector with boot instructions”
It would be very annoying to write all those bytes by hand. You would need to remember what values correspond to what CPU instructions on your machine, then type them in with a special editor. You could do that, if you are crazy enough, so if you really want to do it, go for it. For everyone else, though, some very smart people created something that can help us with all of this: Assembly. So let’s rather use that.
Let’s start coding Link to heading
The Assembly, or short asm, for this boot sector is very simple.
loop:
  jmp loop

times 510-($-$$) db 0

dw 0xaa55
Okay, great. What does this do, though? Don’t worry, I will explain the code step by step.
loop: This is a label. They are a way to address parts of your code.
jmp loop Will jump to the given position in our program. In this case, we jump back to the position of our label loop
times 510-($-$$) db 0 times will repeat a given instructions a specified amount of times. In this case, we say we want to repeat writing a 0 (you remember all the zeros in the hexdump?), and we want to do it 510 times, because remember, the last 2 bytes are reserved. But because we already have instructions in those 510 bytes, we subtract the size those instruction take up from the 510 bytes we have available.
Time to compile and run Link to heading
Okay, now we have some code and know what it does, but we cannot yet execute it. We need to compile it to binary, and here is where we use nasm.
Compile your file with this command.
nasm simple_boot.asm -o simple_boot.bin
where simple_boot.asm is the file with your source code and simple_boot.bin will be the file which the compiler spits and for you to execute.
If you want, you can look at your boot sector using hexdump, just like I did to show you the example bootsector.
hexdump simple_boot.bin
But we still don’t know what to do with it. We can’t just execute our binary like we would with other programs. This is a program that is called while booting. From a boot sector. But stop right there. Don’t write it on a boot sector on one of your hard drives! Are you crazy? That’s what qemu is for. We don’t want to risk our current system, do we? So let’s use it to load our boot sector by executing either
qemu-system-x86_64 simple_boot.bin
or
qemu simple_boot.bin
depending on your system.
And now look at the fruits of your hard work!
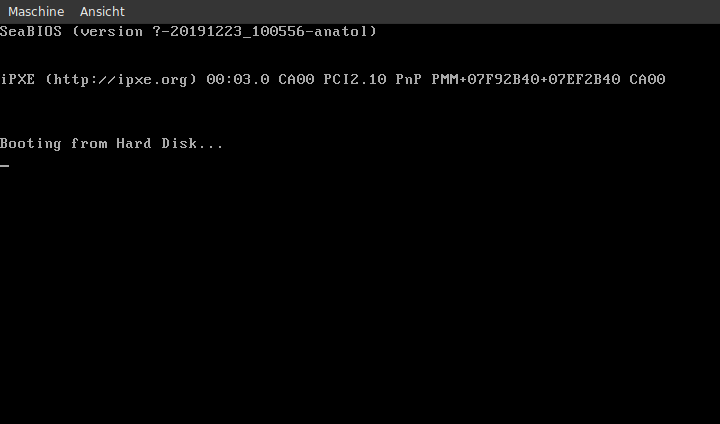
Isn’t this awesome! Okay, there is not much happening. It’s just an infinte loop after all. But think about it: you just wrote a program that does not rely on an operating system. It’s started by the BIOS, you have full control of the system at this point. And you’d need no more than 512 bytes of RAM. You don’t need to boot an operating system, you ARE the operating system. That sounds more exciting, right? Okay, we don’t do much with that power at the moment, but soon we will.
In the next article, we will try to print some stuff on the screen. This should be a bit more interesting, and we will learn about interupts and registers.